How to Set Up Your Domain as a Bluesky Handle!
Table of Contents
The new social media platform Bluesky is gaining a lot of attention after becoming accessible to everyone a year ago. It was initiated by Twitter founder Jack Dorsey. It is therefore not surprising that, at first glance, it closely resembles the former Twitter, now X. Users can post short messages of up to 300 characters, as well as photos, videos, or GIFs. However, the key difference lies in its goal of decentralization, as Bluesky is not controlled by a central company.
When registering on Bluesky, each user must choose a so-called user handle. This differs from traditional usernames in that it is based on a domain-based system. By default, each user receives a handle in the format username.bsky.social, but they can also use their own domain as a handle. This handle is unique across the entire system and serves as a clear identifier. In contrast, a username can be identical for multiple users.
Why Should I use My Own Domain as a Handle with Bluesky?
When registering on the platform, every user is automatically assigned a handle following this format: username.bsky.social. Not only does this look unappealing, but it is also long and difficult to remember. That’s why Bluesky offers the option to use your own domain as a handle. This brings several advantages:
- Independence in Name Selection: If your desired handle is already taken, using your domain allows you to still secure your (business) name as a handle.
- Increased Credibility: A Bluesky handle with a custom domain looks more professional and trustworthy, especially for businesses and brands. It serves as proof that the profile is official.
- Branding: With your domain, the handle aligns with your existing online presence, reinforcing brand recognition.
- Verification: On other social media platforms, users have to apply for profile verification (blue checkmark). On Bluesky, your domain automatically serves as a form of verification.
- Cross-Platform Username: Bluesky is just one of several platforms based on the AT Protocol. By using your domain as a handle, you can maintain the same identity across all networks built on this protocol.
This is what our Bluesky handle looked like after creating our profile: @inwxde.bsky.social
And this is how it looks after linking our domain with Bluesky:@inwx.de
If you are not yet following us, you can visit our Bluesky profile via the link.
How to Set Your Own Domain as a Bluesky Handle?
To link your domain with Bluesky, you need an existing account. Registering directly with a domain as a handle is currently not possible.
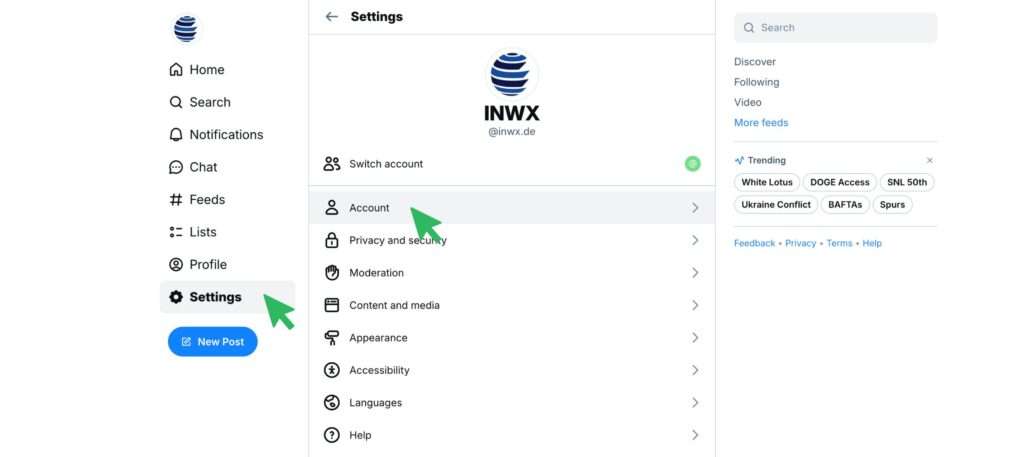
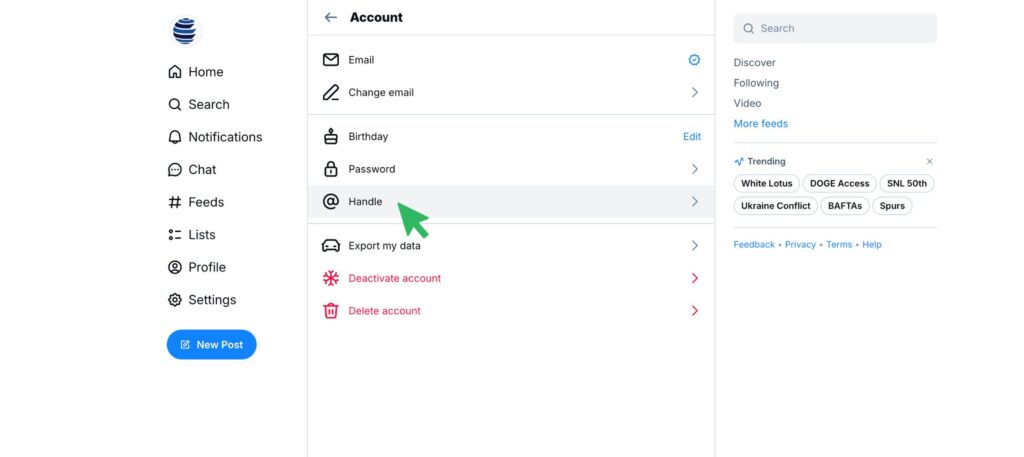
Step 1: To edit your handle, navigate to “Settings” via the menu on the left, then go to “Account” and click on “Handle”.
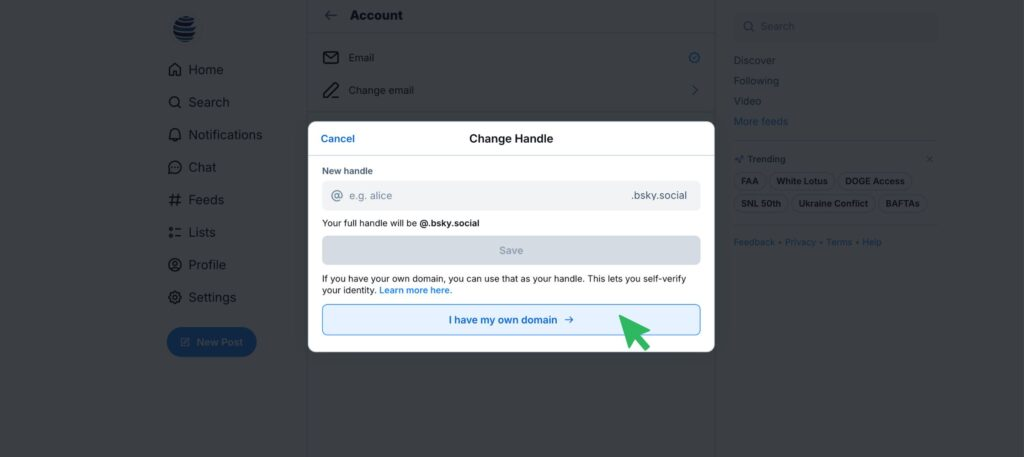
Step 2: A window will open where you could change your handle without using a custom domain. However, to use your own domain, click on the “I have my own domain” button at the bottom.
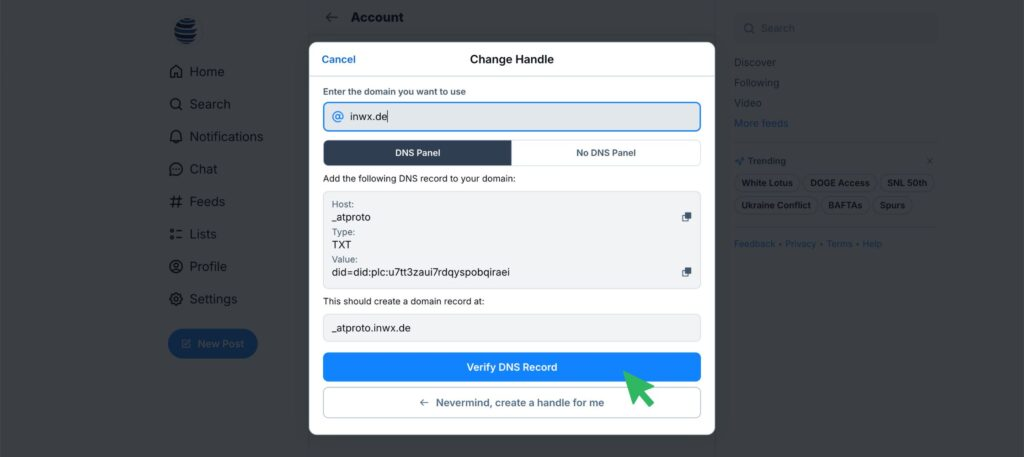
Step 3: Now enter your domain in the designated field. Bluesky will generate a DNS record to verify that you own this domain. Save this record.
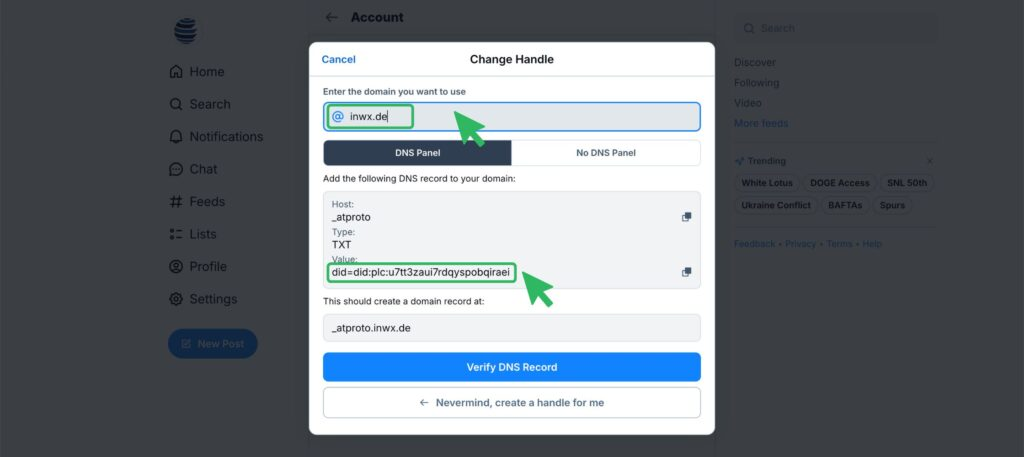
Step 4: You can usually add a DNS record via the customer dashboard of your domain registrar. Since this is a simple TXT record, it poses no risk. That means you won’t accidentally disrupt your website or email services.
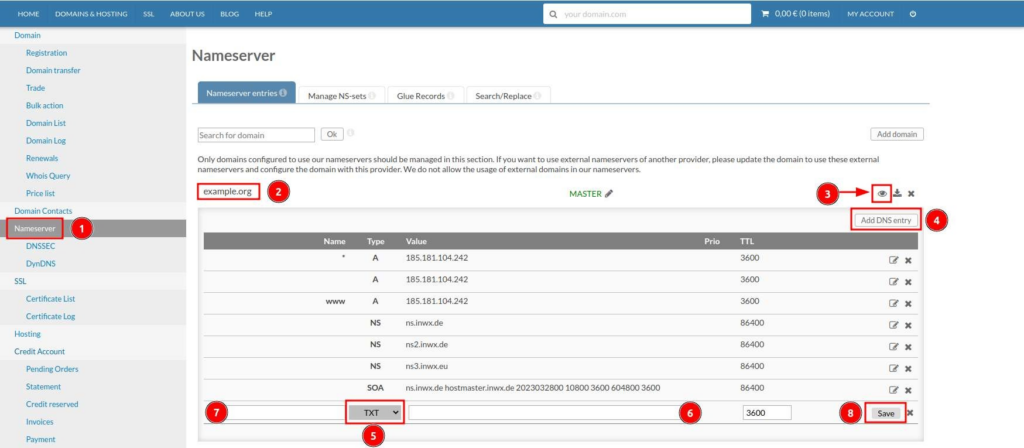
If your domain is registered with INWX, login to your account and follow these steps to add the required TXT record:
- Click on “Nameserver” in the left menu.
- Find your domain in the list or use the search bar to navigate to the domain you want to use with Bluesky.
- Display the existing DNS records by clicking on the eye icon on the right.
- To add a new record, click on “Add DNS Record” on the right.
- From the dropdown menu, select “TXT” as the record type.
- Paste the TXT record provided by Bluesky into the designated field.
- (Optional): If the TXT record requires a specific name or should apply to a subdomain, enter it here. Otherwise, leave the field empty.
- Save the record. It should be active within two to three hours at the latest.
Step 4: If you do not have access to your domain's DNS settings, you can alternatively upload a file to your web hosting. Switch to the “No DNS Panel” option. There, you will see the location where the file should be uploaded, as well as its content. Copy this content into a text file and save it with the name "atproto-did". It is important that this file does not have a file extension. You must then upload this file to the "well-known" directory, which needs to be created in the main or root directory.
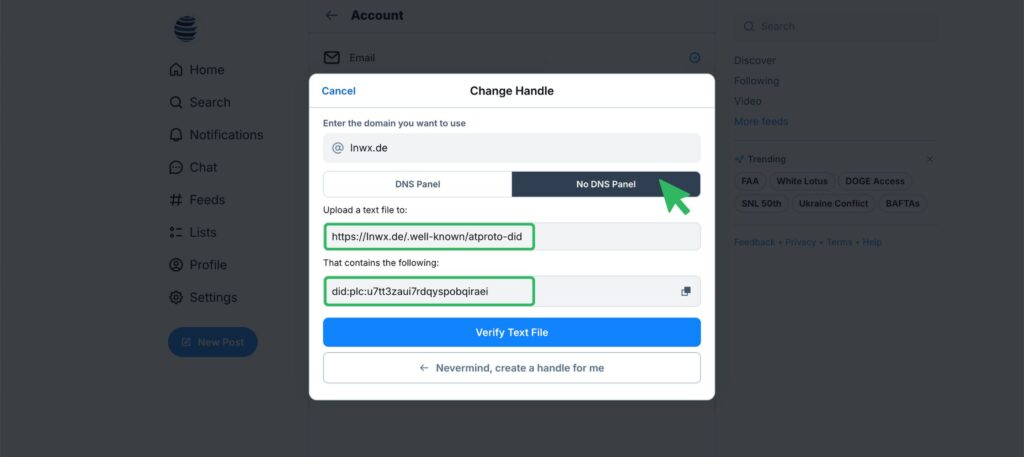
If you are hosting your website with INWX, you first need an FTP user account. You can then set up this FTP access in FileZillaand upload the files to your webspace.
Step 5: Verify your domain. Now, return to Bluesky and open the settings to edit your handle again. Click on the button “Verify DNS Record”. If the domain has been successfully verified, your handle will automatically be updated to the domain.
What If I Don’t own a Domain?
You do not have a domain to use as your Bluesky handle yet. No problem! Registering a domain nowadays is neither difficult nor expensive.
Simply check our domain check to see if your desired domain is still available. Once you’ve found an available domain you like, just add it to your cart and complete the purchase. We’ll take care of the rest of the registration process in the background.

Katrin Hrubesch
Katrin, with her previous experience in web development, understands the many facets of the internet—from domains to websites and digital strategies. Since 2024, she has been a part of the INWX team and sharing her knowledge of web technologies, domains, and current industry trends on our blog.


